Hello everyone, Tam here!
I’m going to recount the story of one of the projects I’ve been working on in the past few months, and how it all went downhill from the very beginning.
Oh don’t worry though. This is not a fancy post-mortem for the biggest game of the year, but its my first so I’ve got at least something to smile about.
In fact in order to be able to write this article let me pull up a happy image just for you and me, and then let’s jump right in.

Part I : Making Decisions (that are going to put you knee deep in it) :
I.1 Intro :
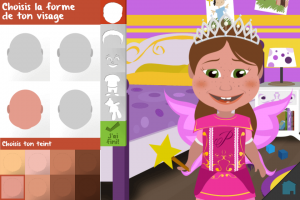
The project is a fairly simple (no offense to the designers) kids game with a dress-up section and two mini games, each themed on a country of the world.
Each mini-game would be accessed via a 3D spinning planet – a variant of the ‘cube menu’ everyone wanted to create with flash dozens of years ago.
Move the planet with a swipe, zoom in or out with a pinch, click on a country , you’ll be sent to the corresponding mini-game. Sounds simple enough (and in fact this happened to be the easiest part.)
The first mini game is a ‘point and click’ game, where you have to find objects in a landscape drawing rich with objects.
The second is just a card memory game with the infamous card flip effect.
I.2 Making decisions….
First note, the 3D spinning planet didn’t require any special effect, lighting or flare, only a sphere and a skybox, so this could even be done with away3D lite (we tried) and run nicely enough – so going stage3D was not necessary.
As we took a closer look at the design documents, we thought that we should decide on which technology/framework or combo of any of these to use by looking at the biggest part of the game, and this was the dress up game. And even then we were convinced this was going to be over in a couple of weeks at worst.
I played my fair share of dress up games on newgrounds back in the day (DON’T JUDGE ME) – and made one myself. A couple of shapes put together in a timeline, two buttons to go back and forth in that timeline to display different types of hair, shoes … and a way to color skin, hair, with a ColorMatrixFilter for example.
We knew there was going to be a lot of coloring going on : the artist included shadows or different shades of the skin color on all parts of the character (even in parts you would not see on small devices) so this had to be taken care of. The hair color also would need to color the eyelashes ! this was the level of precision I agreed to go for even though the final result didn’t reflect that level of detail so much because of the dimensions.
I.3 Digging our graves…
This was not the first mobile project I worked on, but the first I would as Aymeric’s employee. I was already worried about my tendency to code more than is needed, trying to prevent problems before they even arose, that tendency you also may have to just pre-optimize everything or simply expect that your project will evolve so much in the future (who knows) that you need everything to be as modular as possible. That doesn’t help when it comes to deadlines, but it does when a client doesn’t really know what he wants. In this context, the client did know what he wanted… but what he wanted, we would realize later, could’ve been made a bit much better (I mean this iterative process is normal) and you’ll understand how important it was for me to have my code as object oriented and parametric as it could’ve been.
Ok so anyway, we went for the GPU render mode as we were expecting a fair amount of vector assets, and decision was made that the dress-up section and the simple mini-games could be visually assembled in the good old flash pro, and simply instantiated and connected to the code at runtime, no loading screens, and we would leave everything to flash. As for the 3D planet, we would use away3Dlite. Aymeric pushed this idea given his experience and the fact that he had successfully released lots of simple mobile apps using this renderMode, vector intensive but not necessarily complex in terms of ‘moving parts’ on screen. I agreed because I saw no reason not to use this render mode + it made sense specially if you’re experience with the flash editor and you don’t want to waste time re-building layouts in code.
I.4 Being knee deep in it.
Everything was good at first.
I decided to build myself a little framework for multi-resolution support in the native flash display list context – we already have our multi-res support when using starling, but nothing like it for flash itself.
Our multi-resolution system is built of four major “coordinate spaces” :
1.the inevitable flash native stage
2.the viewport (it’s usually sync’d with the previous because it would stay at 0,0 and be of the same size but not in Letterbox mode so we have to consider this)
3. the starling stage which can be scaled on the X or Y axis – though we scale to keep the original aspect ratio
4. The “camera space”. a game world in citrus engine is contained within a ‘viewRoot’ which is moved by the camera object, with zoom, pan and rotate effect this is totally different.
In this game, the camera has not been used, we have ‘static’ screens for all parts of the games.
Anyway, to project a point from the starling stage to the native flash stage, we have to use the right transformation and it is made up of the viewport position, the starling stage scale and the camera transformation matrix.
Anyway, This is not available to us in a normal CitrusEngine + State scenario.
So I created a custom State class that would emulate what happens when we use StarlingCitrusEngine and a StarlingState.
This state would require us to define a baseWidth and baseHeight (the graphic designer having created assets for the biggest resolution we were targetting) and would, on native stage resize events, do the same as StarlingCitrusEngine does to the starling stage : The entire state would be scaled up or down, assets would be loaded in the right size from specific folders… overall this worked fine, but you’ll see, was not that necessary in the end.
There was a big misunderstanding between the graphic designer and us very early on, as vector format would obviously be the prefered and/or logical choice, we ended up getting lots of .png files – and I didn’t object to it. It appeared that the original assets were either not drawn in vector format or couldn’t be easily transfered to a flash friendly vector format on his side so we decided that this wouldn’t matter much in the final product, pngs would do fine. Being overconfident on this project already started to smell bad, We felt the game would be lightweight enough, but later, we were asked to add some features that were not totally explicitly present in the design documents. I came prepared with my expert overly optimized and parametric code, but didn’t expect the issues I would face with the actual render mode we were using – the basis of everything , doesn’t matter how sexy your code looks.
Part II : The GPU render mode, blackbox.
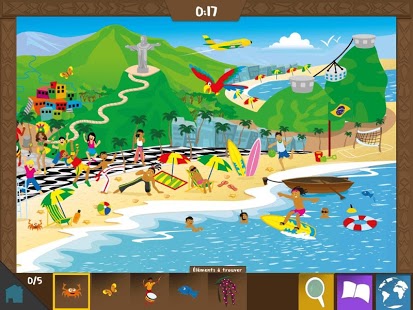
So the first mini game is a “where’s waldo” type of game. Just pan/zoom in a landscape illustration and find the right object. Simple enough.
Keep in mind throughout this article that the multi-resolution system has scaled the root container in which all objects are the same way a starling stage would be scaled to fit different screens.
Each time one object is clicked and found, that object would be highlighted by being overlayed with an image (an outline of the object was the first thing we did).
But as objects were further to the right and to the bottom, these outlines were displaced and even squashed … even though both were in the same container and had the exact same location.
With days if not weeks of testing (and developping other parts of the game) I couldn’t figure out what went wrong. Since everything was created through the flash editor visually, I assumed I was doing things wrong, so I wasted time re-creating things over and over again, double checking… trying other systems, making sure my multi-resolution system was working ok… I made Aymeric test it out… And I built a very simple project to see that issue happen (or not) out of context. It would still happen. For some reason both objects even though being at the exact same location and in the same container would not visually match and the one on top of the other would be distorted. I could only blame myself before blaming anything else, I left out all of my transformation matrix manipulations (who knows) and still, same issue.
This would happen only on some devices…
So the outlines of my objects were distorted and displaced, based on a certain position in space.
I tried any combination of factor (based on screen size) to displace these objects in the other direction and no solution was found, only time was spent for nothing.
I Then told our client that we had to find another solution, and we went for an explosion of stars happening roughly around the found object instead of a perfectly aligned outline. This feedback would work just as well for the player, and we would be hiding the fact that the center of that explosion was displaced… and I would place that object on the location of the touch so to get closer to the finger as possible (not the center of the object) .
During this time spent analyzing my possible mistakes, I tried every and any suggestions found , of course cache as transform matrix was turned on and off , nothing did the trick or changed the results (apart from actually displacing the object itself from the location it was supposed to be in) .
My conclusion is:
The GPU render mode is a blackbox system supposed to ease your life, and it does in most cases, but in edge cases you will have issues dependent on devices/os – something we don’t want/expect when using flash, and you have absolutely no control over what’s going on in the GPU (you can only give some kind of hints as to what is what with the cache as matrix functionality) . When you come from a lot of starling development, just stick with it, at least you control your texture’s quality and what goes on with it. If I may suggest an analogy, giving your project to the gpu render mode (when everything is in the normal display list) is like giving flash the freedom to make one asset jump from gpu to cpu at any time with you just watching helplessly – if you didn’t do things correctly or if you are in edge cases.
I would very much like to hear some feedback on this. Perhaps I have misunderstood everything there is about the gpu mode – But with stage3D now, I don’t see the point in using it – On top of that, the misunderstandings we’ve had with the graphics designer made me work with bitmaps instead of at least having some simple assets (like outlines) be vectors which could’ve helped but as we already were late, I just took what I was sent and ran with it , thinking It was the best solution possible.
Part III : The GPU render mode, bitmap decompression.
The dress up game was very hard to create with the flash editor.
Actually Aymeric created a skeleton project for me to work on this part and it worked fine, with all the assets we had for it (we received assets progressively during the developement).
Coloring my characters should’ve been straightforward. just grab one image, apply a color filter and boom.
of course everything was separated in a lot of layers (in the end we actually can go over 200 , depends on what you dress up with.)
First mistake is thinking the color filter would be fine (I’m talking about the same color filter you have in photoshop.) when multiply worked just as well for the purposes of this project and the graphic designed agreed that the multiply blend mode would work. A color filter doesn’t exist in flash, you can only go through a shader filter to use it (created with pixel bender which refused to run on my windows 7) . There’s a set of .pbx files out there that would create a shader filter behaving like a photoshop filter. so trying out coloring on retinas or skin worked fine with the multiply blend mode and, you can actually create a ColorMatrixFilter that will, once applied to a greyscale image at least, work the same as a multiply blend mode. Just use the Color class ( in the fl.motion package) ,create a white color, tint it. use its properties to create a ColorMatrixFilter and apply it. that’s all really.
I would load up the skeleton project with default assets, but I could not grab bitmaps from it. This can in fact only be done if your bitmaps are exported for actionscript in your .fla (otherwise, they are represented as bitmap filled Shapes). Not a problem in theory as you can get the bitmapData associated with that bitmap fill but you’ll obviously loose the original version… so you have to redraw the shape, with a different bitmap data copy and so on.
With a working solution in hand , I started testing on devices. A massive fail even on the most performant ones we have.
Everytime a bitmap was moved, flash would decompress it completely (regardless of whether or not I was caching it.) . Spikes of 500Mb allocated memory were seen in the ScoutCC profiler and crashes were happenning when you started to change your character too fast (obviously garbage collector was overwhelmed or too slow) . The character needed to appear during the game, and I couldn’t bare thinking that I would have to re-instantiate and color it everytime so I drew him on a bitmap once, saved it in external storage.
That was inacceptable… and I ran a bit late… but Aymeric trusted me even though I thought I completely failed.
Of course in hindsight, a lot of decisions I made were wrong. In fact when all went to hell and the weekend came, I just thought … well hell. How hard could it be to port everything to starling – were I do have control (at least more than I have now ) ?
Part IV : Moving over to starling.
Trying to force the idea that starling was the solution was not easy – since we were already late and my problem is never finishing my personal projects because I would try to rethink and rebuild parts of it, then get bored or do something else. That was not a personal project, all the problems came from the mode we were rendering in, and the horrible amount of details and images we had to keep, so this definitely had to be done.
I Started thinking about all different parts of the game. The 3D planet. The memory mini game with flipping cards (an effect that you cannot create with starling because fake 3D transforms are not included yet or it would simply be a burden to starling if it was made an option) , the ‘find an object’ game… oh and the video transitions we had to display, I forgot to tell you about that.
I would first start from scratch a character dress-up system that I would base on render texture and the fact that all starling images can be multiplied with a color simply by using the color property.
Each eyes, mouth, hair could be composed of more than one layer of graphics, a hair element could have two sub elements, the front hair and the hair that fell on the back of the character. So by hand I listed all possible elements, each with indices for draw order, and indices for the kind of coloration they required if any.
The character object would collect all those elements, sort them by indices and loop through each of them to see if they were active or not, color them if they needed coloring , and draw that to a render texture.
Where previously that would take at least 2 seconds on an Ipad, this was pretty much instantaneous even with all elements activated (+200 elements).
Then I went on to create the ‘find an object’ game which had no displacement problem but we kept the ‘star explosion’ as an indicator for the fact that the object was found anyway.
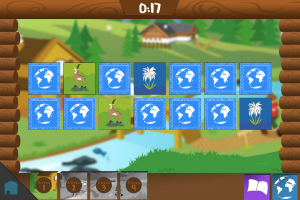
For lack of time, the memory game was kept in the display list – so we could keep the card flipping effect.
By the way, to flip a card on its own center in the flash display list, you have to first set its perspective projection to its center (in world coordinates, not local) then just rotate the matrix3D as you would with a normal matrix to transform something around an anchor or pivot point :
private var currX:Number ;
private    var currY:Number ;
private    var centerX:Number ;
private    var centerY:Number ;

protected var _rotZ:Number = 0;

public function setPos():void
{
currX = this.x;
currY = this.y;
centerX = this.width / 2;
centerY = this.height / 2;

z = 0;
transform.perspectiveProjection = new PerspectiveProjection();
transform.perspectiveProjection.projectionCenter = new Point(currX + centerX, currY + centerY);
}
public function get rotZ():Number
{
return _rotZ;
}

public function set rotZ(value:Number):void
{
if (_rotZ == value)
return;

var m3D:Matrix3D = transform.matrix3D;
m3D.identity();
transform.matrix3D.appendTranslation(-centerX,-centerY,0);
transform.matrix3D.appendRotation(value, Vector3D.Y_AXIS);
transform.matrix3D.appendTranslation(centerX + currX,centerY + currY, 0);
transform.matrix3D = m3D;
_rotZ = value;
}
I would call setPos() once the card is created (so that I know its width and height).
The card is not transformed by its parents so we can consider its parent’s coordinates system to be ‘parallel’ to the stage so the perspective projection is easy to setup.
Part V : The 3D Planet and starling/Away3D interoperation with CitrusEngine

Alright we’re getting to the good stuff. So far I didn’t have much code to share, some was lost as I was desperately struggling to find solutions so I could only tell you about my experience, hoping that you won’t go through the same and simply not choose GPU at all.
V.1 : starling and away3D.
I suppose you can mix starling and away3D in a couple of ways, our example from the CitrusEngine examples repo shows how to use Away3DCitrusEngine so that starling sits on top of away3D… I didn’t want to use Away3DCitrusEngine… Specially because it doesn’t handle multi-resolution like StarlingCitrusEngine does and would brake almost everything.
So here’s how we add (in a hack’ish manner) away3D to StarlingCitrusEngine so that it would run only when we want it to :
public static var A3DView:View3D;
public var stage3DManager:Stage3DManager;
public var stage3DProxy:Stage3DProxy;

override public function initialize():void
{
	stage3DManager = Stage3DManager.getInstance(stage);
	stage3DProxy = stage3DManager.getFreeStage3DProxy();
	stage3DProxy.color = 0x00000000;
	stage3DProxy.addEventListener(Stage3DEvent.CONTEXT3D_CREATED, onContextCreated);
	stage3DProxy.antiAlias = 1;

	//...
}

private function onContextCreated(evt:flash.events.Event):void
{
	stage3DProxy.removeEventListener(Stage3DEvent.CONTEXT3D_CREATED, onContextCreated);
	Starling.handleLostContext = true;
	setUpStarling(false, 1, null, "baselineExtended", stage3DProxy.stage3D);
}

override public function handleStarlingReady():void
{
	_starling.simulateMultitouch = true;
	_starling.shareContext = true;
	//...
}

override protected function resetViewport():Rectangle
{
	var vp:Rectangle = _viewport = _starling.viewPort = super.resetViewport();
		trace("Current Viewport :", _viewport, "found nearest scale factor :", scaleFactor, "starling scale factor :", _starling.contentScaleFactor);
	if (stage3DProxy.configureBackBuffer.length == 2)
		stage3DProxy.configureBackBuffer.apply(null, [_viewport.width, _viewport.height]);
	else if (stage3DProxy.configureBackBuffer.length == 3)
		stage3DProxy.configureBackBuffer.apply(null, [_viewport.width, _viewport.height, _starling.antiAliasing]);
	else if (stage3DProxy.configureBackBuffer.length == 4)
		stage3DProxy.configureBackBuffer.apply(null, [_viewport.width, _viewport.height, _starling.antiAliasing, true]);

	return vp;
}

public static function startAway3D():View3D
{
	var ce:Main = (CitrusEngine.getInstance() as Main);
	A3DView = new View3D();
	A3DView.antiAlias = ce.starling.antiAliasing;
	A3DView.shareContext = true;
	A3DView.stage3DProxy = ce.stage3DProxy;
	ce.stage.addChild(A3DView);

	return A3DView;
}

public static function stopAway3D():void
{
	if (A3DView)
	{
		var ce:Main = (CitrusEngine.getInstance() as Main);
		A3DView.dispose();
		ce.stage.removeChild(A3DView);
	}
}
In the StarlingState where I need to create my 3D planet…. I need a View3D which I simply get by calling Main.startAway3D();
And that’s it, I call Main.stopAway3D() when I get out of the state.
V.2 Clicking on countries on a 3D sphere.
Again, running out of time, this was yet amazingly simple to do… I mean once you decided that a little hack and display list magic is ok.
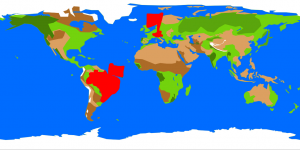
I load in a .swf with a map of the world (the same image texture that I would use for the planet sphere) and in the .fla I drew over the countries I needed with some shapes which I put in MovieClips with names.
So if I were to click on any of these and the .swf would be on screen, I would just be clicking on those MC’s with names (the bitmap itself is not an interactive object yet for debugging purposes, I kept it.) so yes, those are simple targets in 2D space. The idea obviously is to transform the 3D point that I click on the sphere, into 2D and “hit test” that point on the MC to find if I clicked on an actual country.
What I really want is the uv coordinates of my click on the 3D sphere.
I first get the vector3D of my click with
var pos3D : Vector3D = e.localPosition;
Then I normalize it (my sphere happens to have a radius of 100 and be placed at 0,0)
pos3D.scaleBy(1 / 100);
Here’s my magic 3D normalized position to UV coordinates converter.
Now this was the result of simply adding, removing, multiplying and dividing values at pseudo-random , trying to make sense over my debug view where I drew a red circle where that position should’ve been on the flat map as I hovered the 3D sphere.
var u : Number = (1 - ( (Math.atan2(pos3D.x, pos3D.z) - Math.PI / 2) / (2 * Math.PI)) ) % 1 ;
var v : Number = 1 - ( Math.asin(pos3D.y) / Math.PI + .5 ) ;
I’m pretty sure one of you is going to simplify that u calculation fast. I don’t even remember what that %1 was there for (probably when the point was actually not looking right on the X axis , I would do %1 to ‘loop around’ the position so it stayed within the 0-1 range as I tried debugging things. Just remember, this definitely depends on the way the 3D software would map the texture out, how the sphere would unfold etc… I’m pretty lucky this works (and its definitely accurate.)
The final X/Y positions on the map would be the uv coordinates (that are normalized) taken to the dimensions of the actual map movie clip :
var testX : Number = u * (map.width / map.scaleX);
var testY : Number = v * (map.height / map.scaleY);
here I’ll project that local point to global because hitTestPoint requires global coordinates (_p and _resultP are helper points)
_p.setTo(testX, testY);
_resultP = map.localToGlobal(_p);
Then What I did was just test my targets one by one – I’m sure you could find other less expansive ways to do that but we have only 2 countries for the moment :
if(map.target_brasil.hitTestPoint(_resultP.x, _resultP.y, true))
{
trace("you clicked brasil !");
}
V.3 Sidenote about Skyboxes.
With this projects, my “planet” state used away3Dlite (when in gpu mode) away3D 2, 3.6, 3.7, 4, 4.1… well I think I’ve went over a looot of versions of away3D for dumb reasons I can’t explain… but it wasn’t very hard to update/upgrade (just know that I never ever seriously touched away3D before that) . The skyboxes changed and so did the accepted format. The graphic designer did manage to give me the right format from the very beginning but as I started exploring version , the required format changed… Anyway, this tool from nicoptere was incredibly handy to cut the skybox cube map from the flat png I was given.
http://en.nicoptere.net/?p=1955
This returns a CubeMap, which is like a BitmapCubeTexture. Away3D creators did change the naming convention quite a lot, but then again, who is actually going to try out all version over the course of a day like I did.
Part VI : StageVideo killed the adobe star
Yes this title is cliché. But the idea is there. So far I never felt so helpless and even started to question the legitimacy of me being a developer.
Remember those video transition between states I told you about? maybe not.
Well between mini games and profile creation/ dress up screen, we have video transitions.
I started off with moving the stage3D away, putting a very simple and lightweight class to hold an url to a video and a callback to be called once the video is done. I’d trigger it, it would self destruct and usually the callback simply creates the next state I want to have.
Fine.
But once you add a listener for a StageVideoAvailabilityEvent, everything crashes or at least no longer renders.
We found no solution to that. And again, this might sound like I’m just putting stuff together and don’t know what I’m doing but we had no time to find a solution to assemble the entire project in other ways as we could prove that it was linked to the use of starling + away3D in combo .
So we ended up using a normal flash Video object – HD quality was not a requirement anyway.
Part VII : Conclusion
I’ll stop there. VII is a nice number (specially if there’s two F’s before it) .
There was further issues when trying to use expansion files on Android, it seems some android version have trouble mounting the .obb file correctly , or corrupt files are found. The solution to that was to completely unzip a zip formatted .obb file into external storage and just load stuff through there, because enough is enough.
And StageText issues : briefly, strings got doubled when the restrict property was true on certain devices so I had to leave it out. Thanfully these days, StageText is being looked at, I hear.
The game was shown in time at the expected realease date for a press conference and even Apple decided that I went through too much so the very morning of the conference reviewed positively the full version of the app. Or maybe that’s just coincidence?
That’s my first experience as an employee so I’ll keep all the mistakes , misunderstandings and bad choices in mind. Obviously as I think about it, there was a lot of mistakes on my part – or things I should’ve talked about earlier during the production process.
—
If you are really curious, here are the links to the app in question :

Android , Free/Full :
Free : https://play.google.com/store/apps/details?id=air.com.kbstudio.PataTrottersLite
Full: https://play.google.com/store/apps/details?id=air.com.kbstudio.PataTrotters
IOS
Free : https://itunes.apple.com/us/app/id880622460
Full : https://itunes.apple.com/us/app/id879475182
Urgh, really feel for you Tamsen! Love the detail you go into, some useful little warnings in there. Bien fait!